
There are numerous ways to create this look, some easier than others try using round stickers to tape off where you DON'T want color - I think I'll try this next time!
For Now though, I did a freehand approach - Not the cleanest look I've created, but you get the idea :)
Step 1: - REMOVE YOUR OLD POLISH - I can't tell you how many times I've gone to do someones nails, and have found Layers upon LAYERS of Nail polish!! JUST REMOVE IT!
Step 2. File Your nails - Shape them - trim your cuticles- whatever you need to do, Now is the time to do it. Then apply your base coat. I've tried a lot of base coats, and surprisingly LA Colors Top Coat Base Coat works best for me. I wear polish all the time, and have no problems with stained nails! It's very inexpensive - you can pick up a bottle at just about any Dollar Store for $1!

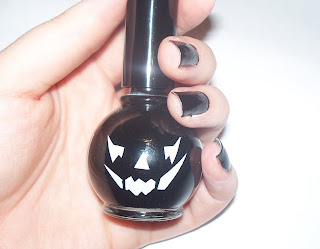
Step 3. Paint your nails your "All over color" - I'm using A black polish by Blue Cross Cosmetics that I picked up at Rite-Aid around Halloween. It's the Absolute most fantastic black polish that I own. ONE coat is all you need - it's VERY opaque. If you've tried a lot of black polishes, then you know how rare this is! - Most are very sheer and require multiple coats to get a nice opaque coat.
Step 4 - This is where you need a steady hand, and a fine detail Brush if you are using the freehand method that I chose. For the half moon part of my nails, I'm using a silver polish - again from Blue Cross Cosmetics. I picked this color up around the Holidays - The bottle is shaped like a snowman - These SELL OUT FAST. I tried to pick up a nice selection of these, but missed out on some great colors! If you see them, and you want to try them, don't wait - there's a good chance that when you return they won't be there!

Use your detail Brush to carefully draw the moon shape, and fill it in. You may need multiple coats. I used 3 of this metallic silver color.
If it gets a little messy, don't worry you can always take a thin striper in black and clean up your lines.

On my ring finer, I used a dotting tool to just make a row of dots down the nail.
Step5. Seal your look with a top coat! My favorite is Seche Vite. It's a little more expensive at some places, but look around. If you have a Sally Beauty Supply near you, you can pick up a bottle for $7.99 or $6.49 if you have a Beauty Card!
Seche Vite Dries Faster than any other top coat that I have ever used, and not just a "tacky dry" but COMPLETELY DRY. It also gives your manicure a very glossy look. I love it, it is WELL worth the splurge for a top quality product!
Step 6. Clean up around your nails, cuticles, and anywhere else that you may have gotten polish on your skin with a q-tip, or corrector pen. I like to use this one by Cutex.

That's it! I hope you liked it- If you decide to try this manicure, send me a picture or a message and let me know how you liked it!
No comments:
Post a Comment