It's a Sale-abration! I just checked out the sale, there are some GREAT deals!! Some items up to 70% off - GO check it out!!
Thursday, January 6, 2011
It's a Benefit Sale-abration!
It's a Sale-abration! I just checked out the sale, there are some GREAT deals!! Some items up to 70% off - GO check it out!!
Wednesday, January 5, 2011
Seche Vite Top Coat - REVIEW
I have been using this product for nearly a year, and I LOVE it! It really is the best top coat that I have ever used. It dries faster than than any other polish or top coat, it leaves a glossier finish, and it is very durable! I did my nails 3 days ago, and there is only very minimal wear on the tips - with three boys in the house they get a lot of wear! I have found that the top coat withstands quite a bit, and has generally lasted me 6-10 days before I see peeling.
There is a downside to everything though - IF you don't have the time to re do your manicure once a week, it will eventually begin to peel, and when it does it PEELS. Remember that part about all the layers binding together to form one thick coat? Well it peels off as one think coat as well. Regardless of this, I still HIGHLY Recommend grabbing a bottle and trying it out - I've never used another top coat since trying Seche Vite. It really is the worlds finest top coat!
They have plenty of other products that I look forward to trying as well - take a look: http://www.seche.com/
Seche Vite Products are available for Purchase at: http://www.sallybeauty.com/on/demandware.store/Sites-SA-Site/default/Search-Show?q=seche+vite
If you've tried this Top Coat, or any of the other Seche Vite Products, please leave a comment and let me know how you liked them!!
Tuesday, January 4, 2011
5 Min Neutral Eye Look
I think I am going to aim the majority of the tutorials to be very quick and simple - 5 Minute Face tutorials. With 2 kids running around, sometimes that's all the time I have, and I think it will be fun! Today's Look is again with Spectrum Cosmetics. I used the " Get the Look" 3 piece Stackable in Tiny Bubbles ( light cream) Sandalwood ( golden brown) and Soil ( matte brown)
It is $8 for the set and it's available here: http://www.etsy.com/listing/64438566/get-the-look-3-piece-stackable-soil
I also used the Spectrum Cosmetics Mineral Foundation in Beige. It is $12 for a 20 Gram Jar http://www.etsy.com/listing/65095618/beige-matte-mineral-foundation-20-gram
and the eye primer which is $7 for a 5 gram jar:
http://www.etsy.com/listing/61019546/mineral-makeup-5-gram-jar-makeup-eye
Here is the finished look - If you like it please subscribe, and read on! :)
Step 1 and 2 Apply your foundation, fill in your brows, and prime your eyes
Step 3 Apply TINY BUBBLES under the brow, and in the inner 1/3 corner of your eye - There will likely be fallout as you see here, but don't worry, it will easily brush away!
Step 4 Apply Sandalwood to the outer 2/3's of your eye and blend
as much or as little as you want


I opted not to apply any lipstick, but did add a bit of Charming Pigment as my blush!
$5 available here: http://www.etsy.com/listing/63995464/charming-pretty-glittery-pink-mineral?ga_search_query=charming&ga_search_type=user_shop_ttt_id_5651689
I hope you like it! :)

It is $8 for the set and it's available here: http://www.etsy.com/listing/64438566/get-the-look-3-piece-stackable-soil
I also used the Spectrum Cosmetics Mineral Foundation in Beige. It is $12 for a 20 Gram Jar http://www.etsy.com/listing/65095618/beige-matte-mineral-foundation-20-gram
and the eye primer which is $7 for a 5 gram jar:
http://www.etsy.com/listing/61019546/mineral-makeup-5-gram-jar-makeup-eye
Here is the finished look - If you like it please subscribe, and read on! :)
Step 3 Apply TINY BUBBLES under the brow, and in the inner 1/3 corner of your eye - There will likely be fallout as you see here, but don't worry, it will easily brush away!
as much or as little as you want
Step 5. Take a TINY amount of Soil and place it on the very outer edge of your eye, and blend
it slowly into your crease.
Step 6. Apply eyeliner, and Mascara, and you're ready to go :)
OR You can now apply your blush, and lip stick.
I opted not to apply any lipstick, but did add a bit of Charming Pigment as my blush!
$5 available here: http://www.etsy.com/listing/63995464/charming-pretty-glittery-pink-mineral?ga_search_query=charming&ga_search_type=user_shop_ttt_id_5651689
Monday, January 3, 2011
Purple Blue and Golden Yellow Eyeshadow
The look that I chose today was created entirely with Spectrum Cosmetics Makeup. I used Flicker ( iridescent yellow gold), Iris ( iridescent purple) Lenore ( Royal Purple) and Ferric ( matte Blue). If you would like any of these color check out the shop here: http://www.torik2009.etsy.com/
If you want to see the steps I took to create this look - Keep reading!

Step1. Apply Flicker to the inner tear duct area
Step2. Apply Iris next to Flicker in the center of the eyelid

Step3. Apply Lenore to the outer V and Blend.
You could stop here and just have a purple look or you could continue with the next step

Step4. Apply Ferric to the outer corner, and blend it up and in towards the center of your lid.


I hope you all like this! If you have any requests, please let me know!! :)
If you want to see the steps I took to create this look - Keep reading!
Step1. Apply Flicker to the inner tear duct area
Step2. Apply Iris next to Flicker in the center of the eyelid
Step3. Apply Lenore to the outer V and Blend.
You could stop here and just have a purple look or you could continue with the next step
Step4. Apply Ferric to the outer corner, and blend it up and in towards the center of your lid.
Step 6. Blend out the top of Ferric below your brow with some of the Flicker
Step 7. Line your eyes with your choice of Black Eyeliner, Apply Mascara, and You're done :)
I hope you all like this! If you have any requests, please let me know!! :)
Labels:
blue,
ferric,
iridescent,
iris,
lenore,
makeup look,
makeup tutorial,
matte,
purple,
shimmer,
spectrum cosmetics,
tutorial
Sunday, January 2, 2011
Black and Silver Half Moon Manicure
This Manicure, also know as the "Moon", "Gatsby" or the "Cuban" was very popular in the 20's - the 40's and has recently been making a comeback. It is the signature nail look of Dita Von Teese - she's been seen sporting it for years - But this year, it's likely to be bigger than ever. I've seen it done quite a few ways, usually the "half moon" is left bare, or white, but I'm taking a new spin on it, and mixing up the colors a bit.
Step 2. File Your nails - Shape them - trim your cuticles- whatever you need to do, Now is the time to do it. Then apply your base coat. I've tried a lot of base coats, and surprisingly LA Colors Top Coat Base Coat works best for me. I wear polish all the time, and have no problems with stained nails! It's very inexpensive - you can pick up a bottle at just about any Dollar Store for $1!


Step 4 - This is where you need a steady hand, and a fine detail Brush if you are using the freehand method that I chose. For the half moon part of my nails, I'm using a silver polish - again from Blue Cross Cosmetics. I picked this color up around the Holidays - The bottle is shaped like a snowman - These SELL OUT FAST. I tried to pick up a nice selection of these, but missed out on some great colors! If you see them, and you want to try them, don't wait - there's a good chance that when you return they won't be there!
On my ring finer, I used a dotting tool to just make a row of dots down the nail.
There are numerous ways to create this look, some easier than others try using round stickers to tape off where you DON'T want color - I think I'll try this next time!
For Now though, I did a freehand approach - Not the cleanest look I've created, but you get the idea :)
Step 1: - REMOVE YOUR OLD POLISH - I can't tell you how many times I've gone to do someones nails, and have found Layers upon LAYERS of Nail polish!! JUST REMOVE IT!
Step 2. File Your nails - Shape them - trim your cuticles- whatever you need to do, Now is the time to do it. Then apply your base coat. I've tried a lot of base coats, and surprisingly LA Colors Top Coat Base Coat works best for me. I wear polish all the time, and have no problems with stained nails! It's very inexpensive - you can pick up a bottle at just about any Dollar Store for $1!
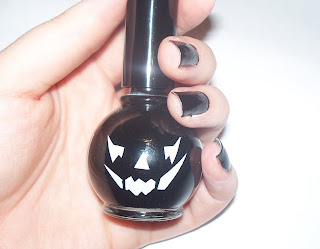
Step 3. Paint your nails your "All over color" - I'm using A black polish by Blue Cross Cosmetics that I picked up at Rite-Aid around Halloween. It's the Absolute most fantastic black polish that I own. ONE coat is all you need - it's VERY opaque. If you've tried a lot of black polishes, then you know how rare this is! - Most are very sheer and require multiple coats to get a nice opaque coat.
Step 4 - This is where you need a steady hand, and a fine detail Brush if you are using the freehand method that I chose. For the half moon part of my nails, I'm using a silver polish - again from Blue Cross Cosmetics. I picked this color up around the Holidays - The bottle is shaped like a snowman - These SELL OUT FAST. I tried to pick up a nice selection of these, but missed out on some great colors! If you see them, and you want to try them, don't wait - there's a good chance that when you return they won't be there!
Use your detail Brush to carefully draw the moon shape, and fill it in. You may need multiple coats. I used 3 of this metallic silver color.
If it gets a little messy, don't worry you can always take a thin striper in black and clean up your lines.
On my ring finer, I used a dotting tool to just make a row of dots down the nail.
Step5. Seal your look with a top coat! My favorite is Seche Vite. It's a little more expensive at some places, but look around. If you have a Sally Beauty Supply near you, you can pick up a bottle for $7.99 or $6.49 if you have a Beauty Card!
Seche Vite Dries Faster than any other top coat that I have ever used, and not just a "tacky dry" but COMPLETELY DRY. It also gives your manicure a very glossy look. I love it, it is WELL worth the splurge for a top quality product!
Step 6. Clean up around your nails, cuticles, and anywhere else that you may have gotten polish on your skin with a q-tip, or corrector pen. I like to use this one by Cutex.

That's it! I hope you liked it- If you decide to try this manicure, send me a picture or a message and let me know how you liked it!
Saturday, January 1, 2011
Hello 2011
I'm not the type to make a "New Year's Resolution". I do however like setting goals for myself, - nothing too extreme, I don't ever plan to scale Everest, Swim with Sharks, or win the Nobel Prize. My passion is not cooking Gourmet Meals, Making purses out of recycled Capri Sun containers, or knitting Scarfs. My main squeeze is Makeup! Lip Stick, Eyeshadow, Eyeliners, Primer, Foundation, nail polish, - even the makeup brushes have me drooling, and wanting more. It's fine, I admit it I have more makeup than I will EVER use in my lifetime, and yet I continuously buy more, and More, and MORE! This year, I'm not going to try to stifle the urges, I'm not going to hide my addiction, and I'm not going to lie about it. I'm going to EMBRACE it, and I'm taking you all along for the ride. :)
It's my personal goal for 2011 to update a review, tutorial, makeup look, giveaway, or a manicure look EVERY Day for the next year.
Happy New Year!
It's my personal goal for 2011 to update a review, tutorial, makeup look, giveaway, or a manicure look EVERY Day for the next year.
Happy New Year!
Subscribe to:
Posts (Atom)